Getting true-to-life photos of your jewelry can be as difficult as, or more so, than creating the piece itself. But, having professional-quality photos of your work is a must. These photos will be used in creating your portfolio, advertising on your website, online shops, social media accounts and for submitting with jurored artisan fair applications. Use the following tips and guidelines from our own professional jewelry photographers to improve the overall quality of your photography.
Below are helpful tips to photograph your beading designs.
Minimum Camera Requirements:

For high resolution photos that will most accurately capture your jewelry, we suggest using at least a 4 Megapixel (2272x1704 pixels) digital camera. You will find that even the cheapest, recreational-use digital camera has 4 Megapixels or more. If you prefer film cameras, use at least a 35mm film camera with 100 or 200 ISO speed film. These requirements are especially important when capturing very small items and details.
A Simple Method for Making Great Images:
Making your own photography "set" is simple and inexpensive. You will need:
To assemble a set where the photographed items will lay on a flat surface follow these directions:
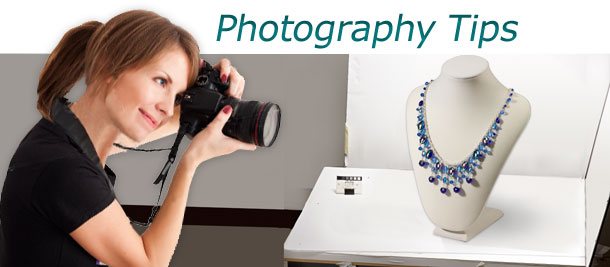
Photographing on a Jewelry Display:
If you want to photograph jewelry on a jewelry display you will need to essentially rotate the whole set, creating a three sided box where the background material is in the center, standing up with the diffusion and reflective materials on either side. The jewelry display will sit in the middle of the three sides and you will photograph from in front of the display.
The Keys to Success:

Below are helpful tips to photograph your beading designs.
Minimum Camera Requirements:
For high resolution photos that will most accurately capture your jewelry, we suggest using at least a 4 Megapixel (2272x1704 pixels) digital camera. You will find that even the cheapest, recreational-use digital camera has 4 Megapixels or more. If you prefer film cameras, use at least a 35mm film camera with 100 or 200 ISO speed film. These requirements are especially important when capturing very small items and details.
A Simple Method for Making Great Images:
Making your own photography "set" is simple and inexpensive. You will need:
- A desk lamp (preferably with adjustable positioning)
- A normal light bulb will work, but a full spectrum light bulb will provide a more accurate color rendition.
- A 24x36-inch piece of diffusing material that is sturdy and semi-transparent (light can pass easily through, but is not clear). The purpose of the diffusion material is to soften the highlights on the subject by spreading out the beam from the lamp. All of the following will work:
- A white bed sheet, doubled up.
- Frosted plexi glass, 1/8 inch thick.
- A large sheet of white vellum paper.
- A 24x36-inch piece of foam or stiff poster board for reflecting the lamp light onto the item.
- 2 - 4 large "A" clamps to use as stands for the diffusing material.
- A clean black or white background; another 24x36-inch piece of foam board is preferred, but paper or fabric is also suitable.
- A camera tripod.
To assemble a set where the photographed items will lay on a flat surface follow these directions:
- Lay down your background material within reach of an electrical outlet on a flat surface.
- Connect the "A" clamps to the two base corners of your diffusing material and prop up on one side of your background, creating a 90 degree angle (or use clamps to hang if using a sheet or thin paper).
- Connect "A" clamps to the base of the reflective material and prop on the opposite side of the background material, directly across from the diffusion material, so the set looks like two walls and a floor.
- Arrange the desktop lamp outside of the set, on the other side of the diffusion material, have it down at a 45 degree angle and shine down on the set through the diffusion material.
- Arrange the item you want to photograph on the background material.
- Photograph from above the set, facing downward.
Photographing on a Jewelry Display:
If you want to photograph jewelry on a jewelry display you will need to essentially rotate the whole set, creating a three sided box where the background material is in the center, standing up with the diffusion and reflective materials on either side. The jewelry display will sit in the middle of the three sides and you will photograph from in front of the display.
The Keys to Success:
- Experiment--watch how the light interacts with the item through diffusion, try different settings, lightings and backgrounds.
- Take lots of photos! There is no limit to how many photos you can take with a digital camera, so feel free to take as many as you want while you experiment with settings.
- Only use a single light source.
- Remember what works! When you take a picture you like, take a minute to write down how the set was arranged, what settings the camera was on and how far from the item you were.
- Always disable your camera's flash. Let the desk lamp lighting do the work.
- Your digital camera should be set on the highest quality image setting possible.
- If you have trouble getting your camera to focus clearly on a small object, you may need to use the macro mode of your digital camera. (This mode is commonly designated by a flower symbol on your camera settings menu.) If your camera is a regular film camera, you may need to use a macro or "close-up" lens.
- Use manual focus if your shots are often blurry.
- If your pictures are turning out too dark, try using an "exposure compensation" setting, usually represented by a +/- symbol on digital cameras. +1 is a good starting point on a white background.
- If you're working with particularly shiny items like crystal and sterling silver, move the diffusion surface and light closer to the object, experiment with mirrors, or a strip of black poster board at the bottom of the diffusion surface (outside of the set) to create a soft shadow over the piece.
- To control the reflection of flat metals, tilt them away from the light source.
- Use a cable release or self-timer to reduce camera shake, even when you are using a tripod, in low exposure situations, camera shake can occur when you press the trigger.
- When styling your jewelry, use jewelry displays that show how the piece naturally hangs.


No Comments Yet